Drive Mad Level 91 Walkthrough - Flip Side Guide
Complete Drive Mad level 91 walkthrough. Learn how to beat Flip Side by flipping the truck upside down to ride the narrow rails under the low barrier, then rotating back upright…
Drive Mad level 91, called Flip Side, is a hard level built around timing, momentum, and balance. The stage looks simple at first, but the real obstacle is a very low overhead barrier in the middle of the track. In a normal driving position, the truck is too tall to pass through. To clear the stage, you need to use the opening movement to flip the vehicle upside down, let the wheels ride along the narrow rails, and stay controlled all the way across before rotating back upright for the finish.
Why Level 91 Feels Hard
This level feels awkward because it asks you to stop thinking like a normal driving stage. The low barrier blocks any standard approach, so the truck has to move through the middle section upside down. That means success depends on a very specific chain of actions: generating enough momentum to flip, landing the wheels cleanly onto the rails, keeping the inverted truck balanced, and then recovering to a normal position at exactly the right moment. Most failures happen when one part of that sequence is rushed or mistimed.
Step-by-Step Walkthrough for Drive Mad Level 91
Step 1: Trigger a 180-degree flip and lock the wheels onto the rails
Start with a quick burst of speed. As the truck reaches the front section of the narrow rail area, use a sharp change in momentum, usually by briefly easing off or tapping reverse before accelerating again, to force the vehicle into a backward roll. Your goal is not a messy half-flip. You need the truck to rotate all the way so the chassis faces upward and the four wheels catch securely on the two side rails. Once the truck settles into that upside-down position, keep your input smooth rather than aggressive.
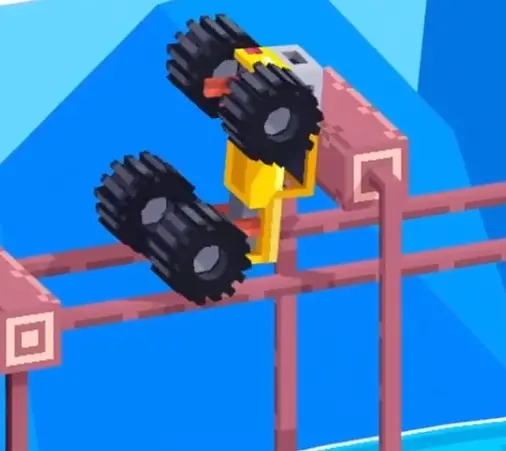
Step 2: Stay inverted through the low barrier and keep the truck stable
Once the truck is hanging upside down on the rails, the job becomes balance rather than speed. Move forward with a steady, moderate pace and avoid sudden throttle changes that could bounce one side loose. The low barrier leaves almost no margin for error, so any wobble can ruin the run. Treat this middle section like a tightrope crossing. As long as the wheels remain aligned on the rails and the truck stays centered, the barrier becomes manageable.
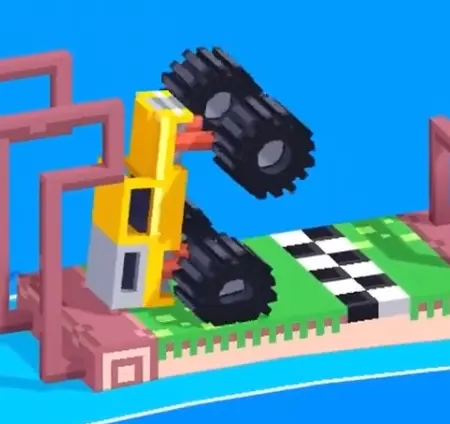
Step 3: Use the exit momentum to flip back upright and land on the finish
Do not simply slide off the rails at the end. Right before leaving the narrow section, prepare for one more controlled rotation. Use the truck's forward momentum to trigger another 180-degree flip so the wheels face downward again. The timing matters here: too early and you fall badly, too late and the roof hits first. The ideal result is a clean upright landing into the black-and-white finish area with just enough speed to settle safely.
Best Cue for Consistent Clears
Flip under, ride steady, flip back.
Why This Method Works
This method works because the stage is really testing two well-timed momentum conversions. The first converts forward speed into a full inversion so the truck's height problem disappears under the barrier. The second converts the exit movement into a recovery flip so the truck can finish in a normal driving stance. Between those moments, balance is everything. By keeping the wheels centered on the rails and avoiding panicked inputs, you turn a seemingly impossible obstacle into a repeatable sequence.
Common Mistakes in Drive Mad Level 91
- Trying to drive through the low barrier in a normal upright position
- Under-rotating the first flip and getting stuck halfway onto the rails
- Over-accelerating while upside down and bouncing off the narrow track
- Letting the truck drift off-center while passing under the obstacle
- Missing the timing for the final recovery flip and landing roof-first
Fast Summary
- Accelerate early to build momentum
- Force a full 180-degree flip onto the rails
- Stay upside down and move steadily under the low barrier
- Use the rail exit to trigger a second 180-degree flip
- Land upright in the finish zone
FAQ
How do you beat Drive Mad Level 91?
Build momentum at the start, flip the truck fully upside down so the wheels ride the rails under the low barrier, then flip back upright right before the finish and land cleanly.
Why is Drive Mad Level 91 difficult?
Because the truck cannot pass the middle obstacle in a normal position. You have to invert the vehicle completely, balance on narrow rails, and then recover at the exact right moment.
What is the main trick in Drive Mad Level 91?
The main trick is using momentum to perform a full 180-degree inversion so the truck can travel upside down beneath the low barrier.
When should I flip back upright in Drive Mad Level 91?
Flip back right as you are leaving the end of the rail section. That gives you the best chance to land wheels-down on the finish platform.